This is a sponsored conversation written by me on behalf of Cricut. The opinions and text are all mine.
Hey guys! I have a special DIY treat for you! I whipped up this super easy DIY rag banner the other day and I am so excited to share it with you!
If you caught my post last week, you know the one where I talked about how great Cricut hand tools are? Well this week, you get to see them in action.

I used all my hand tools to make this super chic Spring coloured banner all from fabric scraps. Read on to see just how simple this DIY is.
Disclosure: This post is sponsored by Cricut. All opinions are my own. Also, this post contains affiliate links – should you choose to purchase through these links I make a small commission at no cost to you.
So I have a bucket of these fabric squares. I was lucky enough to get all these from my sister’s father in law. They are from look books for upholstery, I believe but they are perfect to have lying around for odd DIY projects.

To be quite frank, I have been searching for the perfect project to put them to use. I was thinking about Spring decor a couple days ago and I thought it would be nice to make a spring banner and I have always wanted to try my hand at a rag banner.
With the help of my Cricut Rotary Cutter and some other Cricut hand tools, I was able to whip up this banner in little to no time at all.

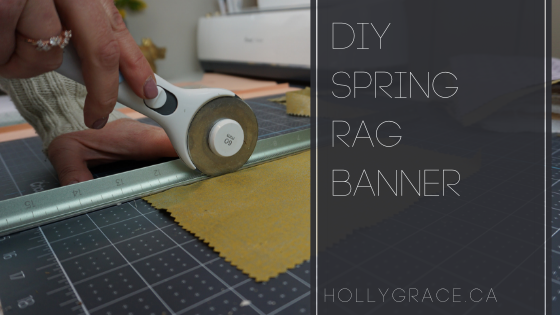
First, I used my Cricut 60mm Rotary Cutter to slice all the fabric swatches into strips.
This was super easy and quick to do with the help of my Cricut Self-Healing Mat and my Cricut ruler.
I did end up switch over to my Cricut Cutting Ruler from the Acrylic Ruler. For the incredible fact that the Cricut Cutting Ruler has a edge guard that makes it easy to do fast and efficient cuts all while keeping your fingers safe.

I used the measurement lines on the Cricut Self Healing mat to make sure all my strips were the same size.

I just kept cutting and cutting til I had a giant pile of strips. I went with a colour palette of creams, whites, purples and greens.
I LOVE purple for Spring decor and what’s funny is that’s pretty much the only time I like that colour.

Once I had all my fabric strips cut, it was time to start putting my banner together. To start off, I took some twine and tied a hoop at the end
It’s easier and you will waste less twine, if you leave the twine on the spool until you’re done making your garland.

After I tied the hoop at the end, all I had to do was tie on the strips around the twine. I created a pattern that I likes and just kept tying the strips on.

I really love the definition in this banner from all the different textures and fabrics that I used. Some were light like cotton and others were like a heavy texture upholstery .

All I had to do was keep working my way down until I had enough strips tied on to make the length of banner that I wanted.
I finished off the banner by tying another hoop knot at the end.
Once I finished my rag banner, I had caught the cutting bug and I wanted to just keep on going using my Cricut Hand Tools, so I decided to use my Rotary Cutter and Acrylic Ruler to make a pendant banner.

This was super easy to do. I just lined up the ruler diagonally, using the markings on my Self-Healing mat as a guide.


Once I had the pennants all cut, I used my Cricut EasyPress 2 and some HTV to apply on the word “S P R I N G”.

Then, I simply hot glued the pennants to a piece of twine.

I thought it would cute to create these little curled circles in the twine as well, so I secured them with a dot of hot glue.

I wanted to add one more banner to my decor so I cut out some bunnies using my Cricut Maker onto a piece of fabric scrap.


Once I had all my banners done, I could hang them up and this is what I made! Check it out:

I love the three banners layered together but I think the rag banner is my favourite of the three.

I’ve always wanted to make a rag banner and now I can check this DIY off my list!


These banners were so easy to make with the help of my Cricut Hand Tools. I couldn’t imagine having to cut all those scraps into strips with just a pair of scissors — probably would have take so much longer!

Do you like this project!? Leave your comments below and make sure you Pin this to your Pinterest boards so you can save this project for later!


2 COMMENTS
Judy c
7 years agoHow long were your strips? I love the banner. I will make several to wrap around my large wine cork wreaths for holiday decor. May make one of all Lilly Pulitzer strips from vintage Lilly patterns. Thanks.
hollygrace13
7 years ago AUTHORYou are welcome!! This strips were smaller in size, they were about 6 inches.